Fuego Quickstart Guide
Overview [edit section]
The overview of the steps is:- 1. install pre-requisite software
- 2. download the fuego repository
- 3. build your fuego container
- 4. start the container
- 5. access the interface
- 6. add your board to fuego
- 7. run a test
These steps are described below.
Install pre-requisite software [edit section]
To retrieve the fuego software and create the docker image for it, you need to have git and docker installed on your system.On Ubuntu, try the following commands:
$ sudo apt-get install git
$ sudo apt-get install docker.io
Download, build, start and access [edit section]
To accomplish the first 4 steps, do the following from a Linux command prompt:
$ git clone https://bitbucket.org/tbird20d/fuego.git
$ cd fuego ; ./install.sh
$ fuego-host-scripts/docker-create-container.sh
$ fuego-host-scripts/docker-start-container.sh
$ firefox http://localhost:8080/fuego
The second step (with ./install.sh) will take some time - about 45 minutes on my machine. This is the main step that is building the docker container.
NOTE: if you are experimenting with the unreleased version of Fuego in the 'next' branch, then please replace the 'git clone' command in the instructions above with this:
- git clone -b next https://bitbucket.org/tbird20d/fuego.git
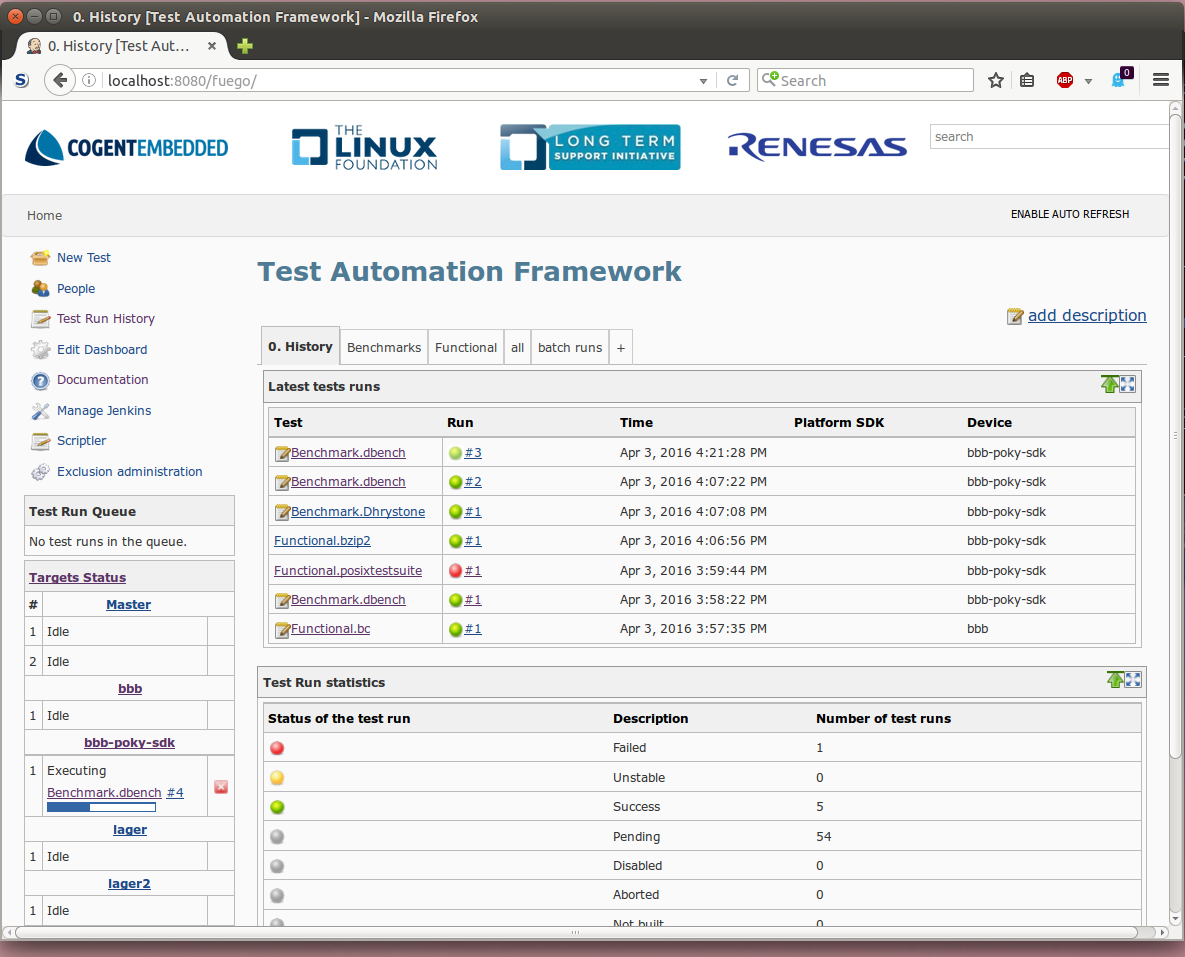
On the last step, you can use any browser instead of firefox to access the Fuego web interface. By default the Fuego interface runs on your host machine, on port 8080, with URL path "/fuego".
In your browser, you should see a screen similar to the following:
Add your board to fuego [edit section]
To add your own board to Fuego, there are three main steps:- 1. create a test directory on the target
- 2. create a board file (on the host)
- 3. add your board to the Jenkins interface
Create test directory [edit section]
First, log in to your target board, and create a directory where tests can be run. Usually, you do this as root, and a commonly used directory for this is "/home/a". To do this configuration do the following:$ ssh root@your_target <target>$ mkdir /home/a <target>$ exit
Create board file [edit section]
Now, create your board file. The board file resides in userdata/conf/boards, and has a filename with the name of the board, with the extension ".board".The easiest way to create a board file is to copy an existing one, and edit the variables to match those of your board. The following instructions are for a board called 'myboard', that has networking access, an ssh daemon running on target, and the ARM architecture.
Do the following:
 $ cd userdata/conf/boards
 $ cp template-dev.board myboard.board
 $ vi myboard.board
Note: you can use your own editor in place of 'vi'
A board file has parameters which define how Fuego interacts with your board. There are lots of different parameters, but the most important to get started quickly (and the most commonly edited) are:
- IPADDR
- SSH_PORT
- FUEGO_HOME
- TRANSPORT
- PLATFORM
IPADDR is the network address of your board. SSH_PORT is the port where the ssh daemon is listening for connections. By default this is 22, but you set this to whatever your target board uses.
The FUEGO_HOME directory is an absolute path where the Fuego tests are run. Normally this is set to something like "/home/a", but you can set it to anything. The user you specify for LOGIN should have access rights to this directory.
Set the value of TRANSPORT to "ssh"
Some of the other options are self-explanatory, such as the LOGIN and PASSWORD, which is the account name and password that Fuego should use to execute tests on the target. The ARCHITECTURE is a string describing the architecture used by toolchains to build the tests for the target. If using an ARM-based target, set the ARCHITECTURE to "arm".
The PLATFORM variable indicates the toolchain to use to build the tests for the target. If you are using an ARM target, set this to "qemu-armv7hf". This is a default ARM toolchain installed in the docker container, and should work for most ARM boards.
If you are not using ARM, or for some reason the pre-installed arm toolchains don't work for the Linux distribution installed on your board, then you will need to install your own SDK or toolchain. In this case, follow the steps in Adding a toolchain, then come back to this step and set the PLATFORM variable to the name you used for that operation.
For other variables in the board file, see the section below.
Add target in Jenkins interface [edit section]
Finally, add the board in the Jenkins interface.In the Jenkins interface, boards are referred to as "Targets".
From the main screen in the web interface, click on "Target Status" (in the left hand pane). Then select "New Node".
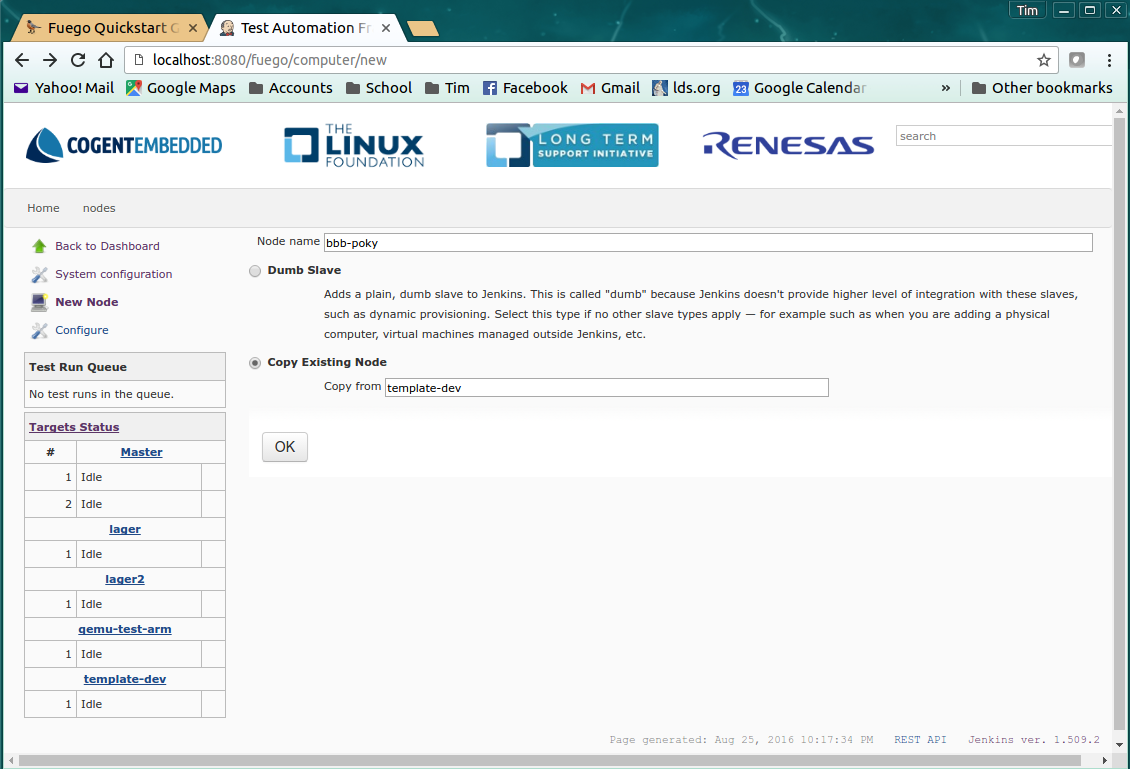
On the New Node page, input the name of the target board, and tell the system to copy from a pre-existing target. Do this by clicking on "Copy Existing Node" and entering template-dev in the 'Copy from' box. Then click 'OK'.
This will take you to the "Configure Target" page.
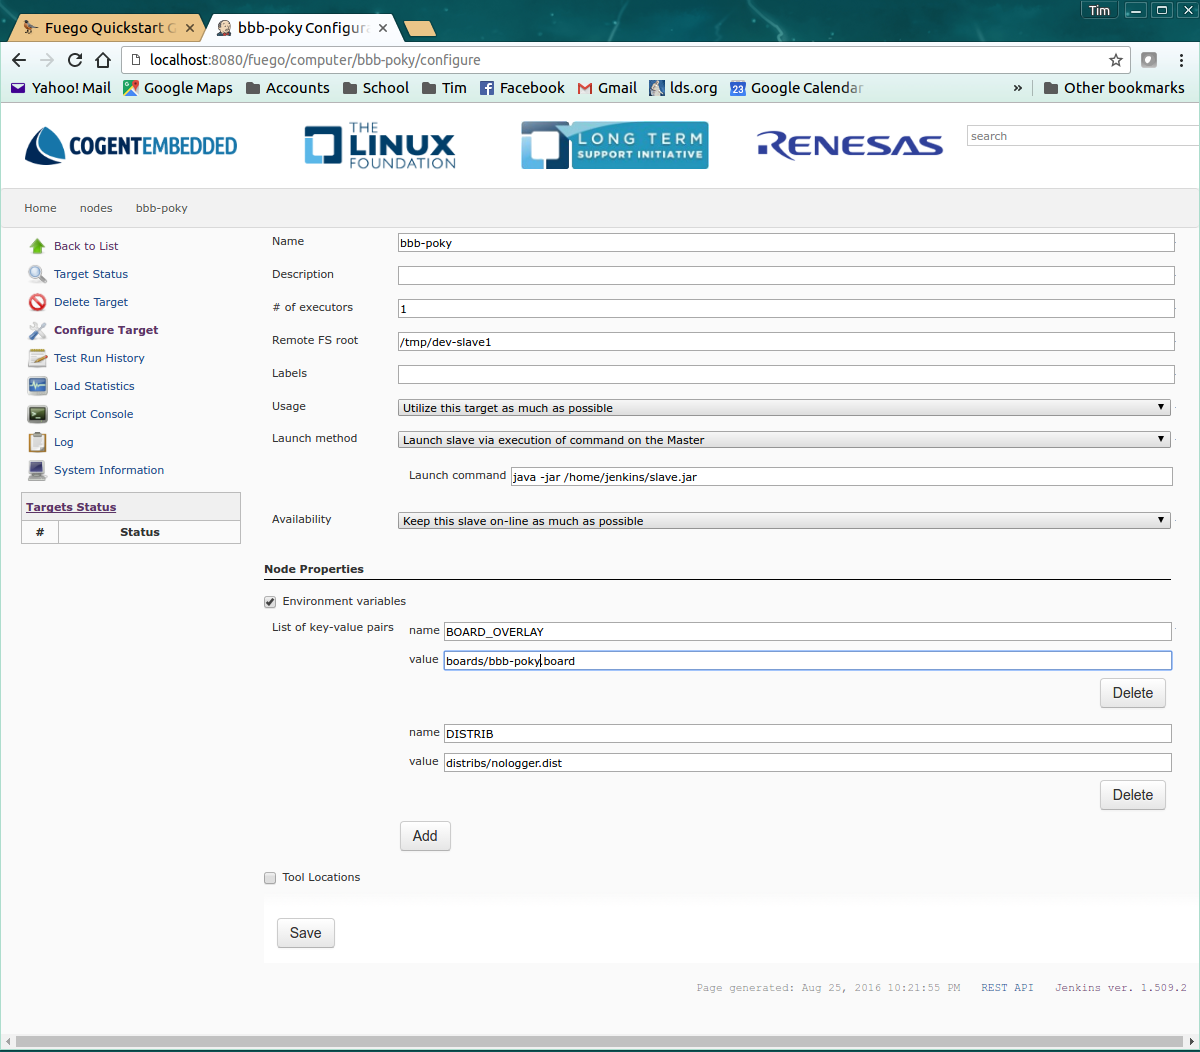
On the "Configure Target" page, the only thing you need to do is change the value for the BOARD_OVERLAY environment variable. Change the value of this field to the name of the board file you created previously. Include the 'boards' directory. For example, you might use: boards/myboard.board
Click 'Save' to finish adding the board to the system.
Run a test [edit section]
To run a test manually, you do the following:- Select a test
- Select the target (myboard)
- Select the testplan (leave it set to default.testplan)
- Click “Run the test”
To select a test, on the main dashboard view, click on one of the tab for test categories (besides History). This would be one of "Benchmark", "Functional" or "All".
Let's run a simple functional test: Functional.bc. This tests whether the program 'bc' on the target operates correctly on some simple expressions.
Select Functional.bc from the list of tests. A page will appear with the current Status and information for this test. In the left-hand menu, select "Run Test Now"
A page like the following will appear:
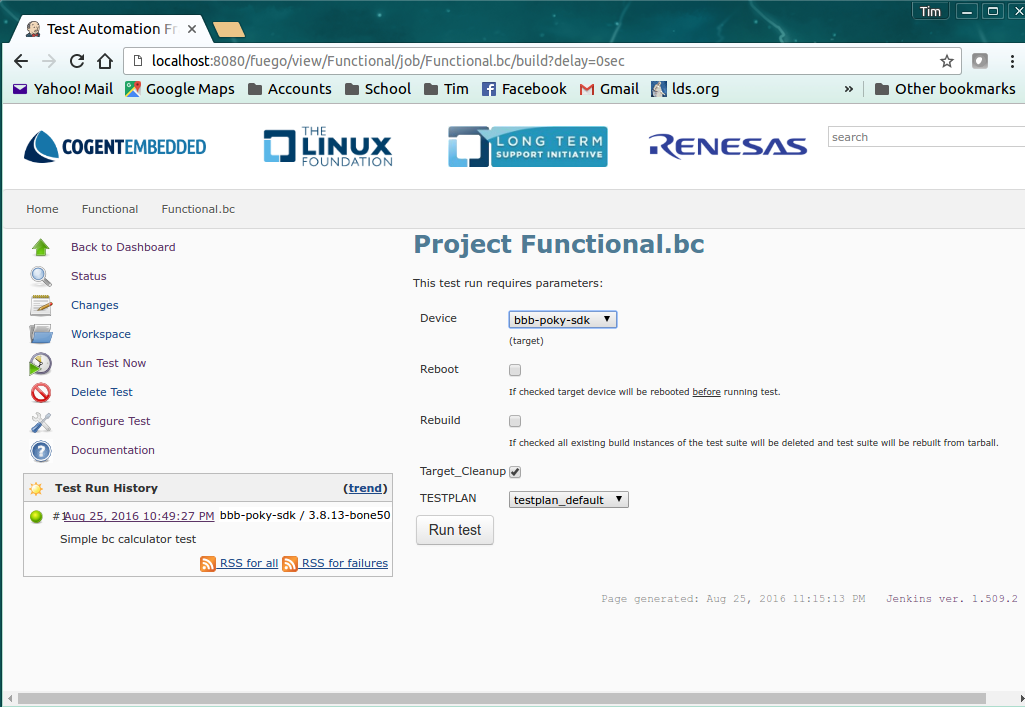
On this page, select the target you want to run the test on from the "Device" dropdown list. (Possibly you might select "myboard", if you've added that to the system. Select the TESTPLAN "default.testplan". Leave other options the unchanged. Finally, click on "Run test".
There should appear a test run in the "Test Run History" pane on the left side of the page, with a progress bar indicating that the test is in progress. You can wait for the test to complete, or right-click on the progress bar, and view the console log for the test, to watch it's progress.
When the test has completed, the status will be shown by a colored ball by the side of the test in the "Test Run History". You can get details about the test run by clicking on the link in the history list.
Additional Notes [edit section]
Other variables in the board file [edit section]
Depending on the test you want to run, you may need to define some other variables that are specific to your board or the configuration of the filesystem on it. Please see Adding a board for detailed instructions and a full list of variables that may be used on the target.
Troubleshooting [edit section]
If you have problems installing or using Fuego, please see our Troubleshooting Guide