Adding a board
NOTE: under construction
Overview [edit section]
To add your own board to Fuego, there are three main steps:- 1. create a test directory on the target
- 2. create a board file (on the host)
- 3. add your board to the Jenkins interface
Create test directory on target [edit section]
First, log in to your target board, and create a directory where tests can be run. Usually, you do this as root, and a commonly used directory for this is "/home/a". To do this, do the following:For target with network connectivity :
 $ ssh root@your_target
 <target>$ mkdir /home/a
 <target>$ exit
For target with Serial connectivity :
Use minicom or any other serial terminal tool. Login to the target by giving username and password. Create the directory 'a' as below:
<target>$ mkdir /home/a
Create board file [edit section]
Now, create your board file. The board file resides in userdata/conf/boards, and has a filename with the name of the board, with the extension ".board".The easiest way to create a board file is to copy an existing one, and edit the variables to match those of your board. The following instructions are for a board called 'myboard', that has networking access, an ssh daemon running on target, and the ARM architecture.
Do the following:
 $ cd userdata/conf/boards
 $ cp template-dev.board myboard.board
 $ vi myboard.board
Note: you can use your own editor in place of 'vi'
Set board parameters [edit section]
A board file has parameters which define how Fuego interacts with your board. There are lots of different parameters, but the most important to get started quickly (and the most commonly edited) are:
TRANSPORT parameters [edit section]
Each board needs to specify how Fuego will communicate with it. This is done by specifying a TRANSPORT, and a few variables associated with that transport type.
- TRANSPORT - this specifies the transport to use with the target
- there are three transport types currently supported: 'ssh', 'serial', 'ttc'
- Most boards will use the 'ssh' or 'serial' transport type
- ex: TRANSPORT="ssh"
Most targets require the following:
- LOGIN - specifies the user account to use for Fuego operations
- PASSWORD - specifies the password for that account (if any)
There are some parameters that are specific to individual transports.
For targets using ssh:
- IPADDR
- SSH_PORT
IPADDR is the network address of your board. SSH_PORT is the port where the ssh daemon is listening for connections. By default this is 22, but you should set this to whatever your target board uses.
For targets using serial:
- SERIAL
- BAUD
- IO_TIME_SERIAL
SERIAL is serial port name used to access the target from the host. This is the name of the serial device node on the host (or in the container). this is specified without the /dev/ prefix. Some examples are:
- ttyACM0
- ttyACM1
- ttyUSB0
BAUD is the baud-rate used for the serial communication, for eg. "115200".
IO_TIME_SERIAL is the time required to catch the command's response from the target. This is specified as a decimal fraction of a second, and is usually very short. A time that usually works is "0.1" seconds.
- ex: IO_TIME_SERIAL="0.1"
This value directly impacts the speed of operations over the serial port, so it should be adjusted with caution. However, if you find that some operations are not working over the serial port, try increasing this value (in small increments - 0.15, 0.2, etc.)
Note: In the case of TRANSPORT="serial", Please make sure that docker container and Fuego have sufficient permissions to access the specified serial port. You may need to modify docker-create-usb-privileged-container.sh prior to making your docker image, in order to make sure the container can access the ports. Also, if check that the host filesystem permissions on the device node (e.g /dev/ttyACM0 allows access. From inside the container you can try using the sersh or sercp commands directly, to test access to the target.
For targets using ttc:
- TTC_TARGET
TTC_TARGET is the name of the target used with the 'ttc' command.
Other parameters [edit section]
- FUEGO_HOME
- ARCHITECTURE
- PLATFORM
The FUEGO_HOME directory is an absolute path where the Fuego tests are run. Normally this is set to something like "/home/a", but you can set it to anything. The user you specify for LOGIN should have access rights to this directory.
The ARCHITECTURE is a string describing the architecture used by toolchains to build the tests for the target.
The PLATFORM variable indicates the toolchain to use to build the tests for the target. If you are using an ARM target, set this to "qemu-armv7hf". This is a default ARM toolchain installed in the docker container, and should work for most ARM boards.
If you are not using ARM, or for some reason the pre-installed arm toolchains don't work for the Linux distribution installed on your board, then you will need to install your own SDK or toolchain. In this case, follow the steps in Adding a toolchain, then come back to this step and set the PLATFORM variable to the name you used for that operation.
For other variables in the board file, see the section below.
Add target to Jenkins interface [edit section]
Finally, add the board in the Jenkins interface.In the Jenkins interface, boards are referred to as "Targets".
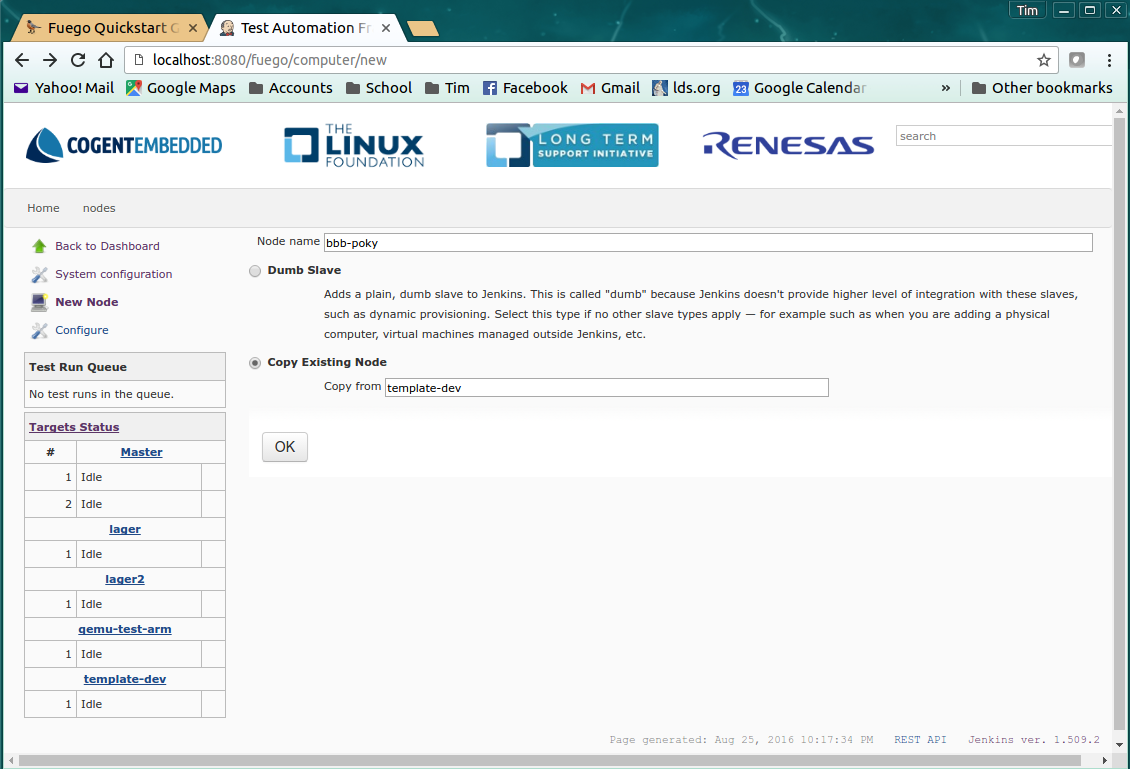
From the main screen in the web interface, click on "Target Status" (in the left hand pane). Then select "New Node".

On the New Node page, input the name of the target board, and tell the system to copy from a pre-existing target. Do this by clicking on "Copy Existing Node" and entering template-dev in the 'Copy from' box. Then click 'OK'.
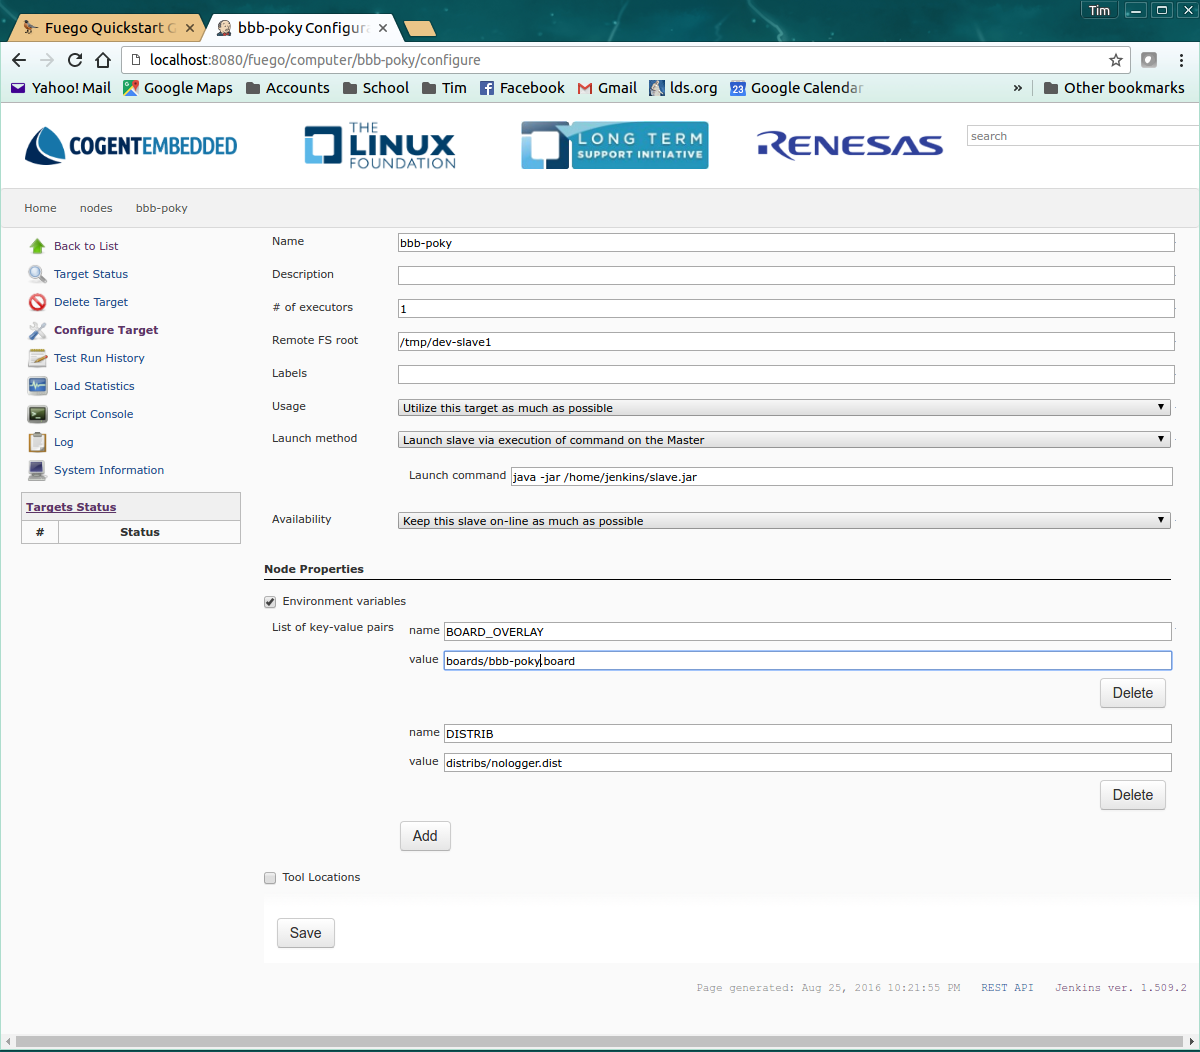
This will take you to the "Configure Target" page.

On the "Configure Target" page, the only thing you need to do is change the value for the BOARD_OVERLAY environment variable. Change the value of this field to the name of the board file you created previously. Include the 'boards' directory. For example, you might use: boards/myboard.board
Click 'Save' to finish adding the board to the system.
Board-specific test variables [edit section]
File System test variables (SATA, USB, MMC) [edit section]
If running filesystem tests, you will want to declare the Linux device name and mountpoint path, for the filesystems to be tested. There are three different device/mountpoint options available depending on the testplan you select (SATA, USB, or MMC). Your board may have all of these types of storage available, or only one.To prepare to run a test on a filesystem on a sata device, define the SATA device and mountpoint variables for your board.
For example, if you had a SATA device with a mountable filesystem accessible on device /dev/sdb1, and you have a directory on your target of /mnt/sata that can be used to mount this device at, you could declare the following variables in your board file.
- SATA_DEV="/dev/sdb1"
- SATA_MP="/mnt/sata"
You can define variables with similar names (USB_DEV and USB_MP, or MMC_DEV and MMC_MP) for USB-based filesystems or MMC-based filesystems.
LTP test variables [edit section]
LTP (the Linux Test Project) has a large number of tests, not all of which may be expected to work correctly on your board. Some of the LTP tests depend on the kernel configuration or on aspects of your Linux distribution or your configuration.You can control whether the LTP posix test succeeds by indicating the number of positive and negative results you expect for your board. These numbers are indicated in test variables in the board file:
- LTP_OPEN_POSIX_SUBTEST_COUNT_POS
- LTP_OPEN_POSIX_SUBTEST_COUNT_NEG
You should run the LTP test yourself once, to see what your baseline values should be, then set these to the correct values for your board (configuration and setup).
Then, Fuego will report any deviation from your accepted numbers, for LTP tests on your board.
EXPAT test variables [edit section]
- EXPAT_SUBTEST_COUNT_POS
- EXPAT_SUBTEST_COUNT_NEG